


Fractal Torrent Nano is Bananas
- A2K
- Feb 10, 2022
- 5 min read
Updated: Sep 3, 2023
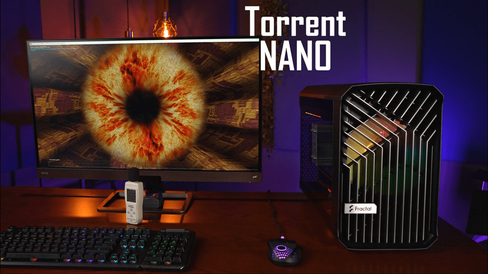
Last year Fractal released a very well received case called Torrent. It came with some pretty impressive 180mm fans and was quickly labelled by the public as an airflow king. Everyone across the whole industry rated it as one of the best cases of 2021. This year we get its little brother Torrent Nano, the scaled down version for a smallish build factor. It comes in at 34.6 litters in size and looks pretty bold. The question you may have - is it worth getting it? Let’s dive in.
First and foremost, this is a smaller case than Torrent but in no way we can call it a small form factor case - these are normally 20 litres or smaller. I would say it is more of a compact case for you to place on a desk while keeping enough space to fit a bunch of components in it. The case comes with a single 180mm fan at the front and it has four different versions: black with dark tempered glass tint, black with RGB and light tint (like we have right here), white with clear tint, and finally black with solid steel panels.


The power supply can be installed at the top of the case just like for its bigger brother Torrent, with a supported length of up to 200mm. For air cooler the maximum height supported is 165mm, which should fit most of the mainstream units. Below you can fit a triple slot GPU with maximum length of 335mm while using the pre-installed fan or up to 310mm if using alternative fans installed in the lower position. There is also enough space for a single 3.5 inch drive, as well as three 2.5 inch drives. If you wish to forgo the larger hard drive, then four 2.5 inch drives can be installed.


At the top of the case we have nicely laid out I/O which includes separate microphone and headphone ports, two USB 3.0 ports, as well as single USB type C 10 Gigabit port.
What intrigued me is the amount of fan and radiator positions this case supports. In its stock configuration it allows to add up to two 140mm fans at the bottom and a single 120mm fan at the back, but bear in mind that thicker graphics cards will take up more space. Similar story goes for the radiator support, if you plan it correctly - there is enough space to mount up to three of them.
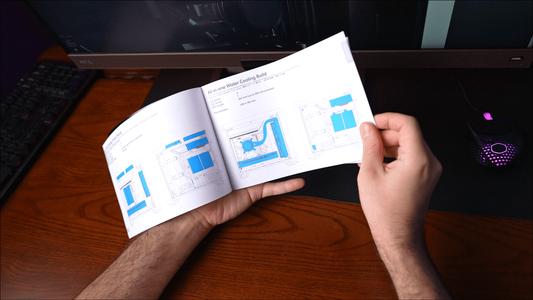
For those who are thinking about doing a full water cooling build (we are actually working on something right now), do make sure to subscribe so you don’t miss it.
With the basics covered, let’s run through what you get in the box and start building. In the larger accessories pack there are brackets to convert from a single 180mm fan at the front to two fans with up to 140mm in size, as well as GPU anti sag bracket.
In the second pack we find all the screws, as well as some cable ties and microfiber cloth to clean all that tempered glass. I am a little conflicted - while I like the screws individually organised, I would prefer all companies move away from using plastic bags for this.
Now to the build itself. For easy access I really recommend taking all the panels off and for this you will not need any tools, it nicely clicks off and on. The included manual is detailed enough even for someone with little experience. I do recommend pulling through the CPU power cable before installing the power supply. Also depending on your motherboard and cooler - you may struggle to reach some connectors so try to plan that ahead of time. That is the fun challenge of building in a smaller case.
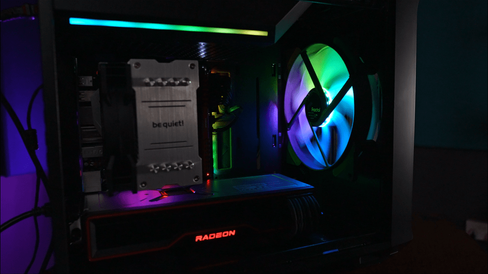
While building, I noticed that the ARGB cable from the fan has a splitter to plug in the LED strip by the power supply, it is a nice little touch. In this particular set-up we are using a two and a half slot 6900XT, and you can see there is still a little bit of space left for a larger card, but it may be a tight squeeze. I found grommet placement around the case is well thought out - especially the bottom right one for the GPU power cables. To push my luck I used cable extensions to both make it look good as well as check if there is enough space to hide the remaining cables, and I must say - this worked out rather well.


Pro tip - if you are running the cables below the graphics card, take off the bottom filter and you will have some extra access. For cable managing the back, there are four well placed Velcro straps which can be used to either neatly route all the cables or like me quickly hide them away. Don’t forget to cable manage up top and install the hard drive cage.
Even with my quick and dirty job as well as those cable extensions - there is still some room to spare, which is a win in my book.
Once everything is done, I must say - it does look really clean. Personally I wish it came with a solid back panel as there is normally nothing nice to show off - especially the way I did it. As it is right now, there is still plenty of space for a larger air cooler, and overall I am pleased with the result.
If I were to rate the build process, iI’d say it is generally pretty easy if you have a smaller graphics card like we have here. For a triple slot card you will likely struggle a bit more, unless you have custom sleeved cables which could be nicely tucked away. Other than that there is plenty of space to navigate around, especially if you mount the cooler last.


For testing we now have a designated test bench which features an overclocked Intel i7 8700k which pulls about 170watts and AMD Radeon 6900XT pulling 255 watts. To keep things consistent we are aiming at 40dBa for the noise normalised tests, because of this the GPU is set to 50% fan speed which comes in below 40dBa. Our testing room noise floor is 32 dBa and ambient temperature is 25 degrees Celsius. Testing is carried out at 50cm distance. To test case performance we are running both Prime95 and Furmark tests simultaneously for an extended period of time to allow all components to reach equilibrium.
Since this is the first use of this particular bench, we won’t have anything to compare it to so apologies for that. Regardless - in our noise normalised test we found the GPU topped out at 95 degrees, and when we ran case fans at default speed, the temperature of the GPU only reached 92 degrees. At stock fan speeds the recorded noise level is 44 dBa.
What is more interesting - in both noise normalised tests and at default fan speeds Fractal Nano managed to hold CPU temperature in the low 80s, but there is a catch. When we look at the power consumption graph, both examples start off strong and after about 5 minutes we find some throttling while running noise normalised fan profile.
This is pretty extreme battering of the system though, so in normal use I would expect this case performance to be pretty good. Another thing to note - the noise produced by this larger fan has a different pitch from your standard fan. It is more of a low pitch humming which is not that distracting (sound sample in the video above, timestamp 6:14).


To conclude - I feel Fractal has delivered a great small case at a reasonable price. While at 120-130 US dollar price mark it is not the cheapest, you do get a premium feeling case with a nice fan and well designed internals. I do wish they included an extra 1 or two fans with this, but other than that - I really cannot fault it.